Recently I have done some work for a small company in Charlotte that makes fiberglass splints. These parts are used to help stabilize an injury, like a broken hand.
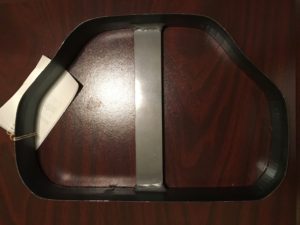
Currently, they use a stamp tool to the cut the fiberglass pad. See Figure 1 for an image of what this looks like. This is an image from the bottom of the tool (the sharp edge is the cutting edge)
The stamp tool is loaded into a machine that will push down very hard into the fiberglass sheet to cut the shape.
The fiberglass comes on a long roll and must be cut to the correct shape. As you can image, they need to make elbow versions, knee versions, smaller sizes for kids, and so on. They have roughly 50-100 of these stamps for each shape.
Their main problem was the time it took to make not only a single piece, but to change from one version to another. When going from one version to another, the operator has to unload the previous stamp and then load a new one. This can take up to 10 minutes.
A much better method would be to use a laser cutter. They recently purchased a laser cutter and contracted me to make the files needed to use with the laser cutter. This file type is called a dxf file. DXF files are line files that the laser cutter uses to trace the pattern to cut.
There are different methods to make the dxf pattern accurately. One would be to 3D scan the stamp tool, but this is overly complicated for what is needed. Another would be to measure out the cutting edge of the tool using rulers/calipers, but this is difficult with curves. The best way is to use a sketch picture. I’ll describe how I do this (I use Solidworks, so my example will be in that program. But I imagine this is possible in other CAD programs as well)
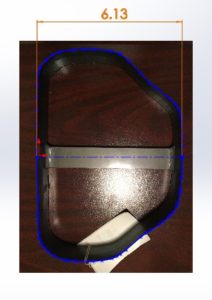
First, take a picture directly over the part, like I did in figure 1. This is critical because otherwise the lines will be distorted. Then bring this into a sketch picture, as shown in figure 2.
All that is needed now is to scale the picture to the correct size. Do this by taking one easy measurement, like the overall width as shown in figure 2.
Once the sketch is scaled, trace the cutting edge. I like to use splines as it easy to make it one smooth continuous curve. Once the sketch is done, save the file as a dxf. Be sure to check that there are no miscellaneous lines or points. If there are, the laser cutter will try to cut these. This can happen if you use some construction lines or points in the file, so make sure to delete those out.
With the dxf files and the laser cutter, the client can now quickly make any pattern they want with zero setup time. They simply load the versions and quantity they want to make into the computer and the laser cutter takes care of the rest. This will save them a lot of money and money.
If your company is currently stamping out parts (could be any material), and using a laser cutter makes sense, contact me and I can help you make the transition.


